Welcome to part 5, the final part of the STEAM 3D printing series of posts. In the previous part, we covered 3D design software and coding. In this part, we will discuss the fine tuning of the model print, using slicer software which should cover science, technology, engineering, and mathematics. We will also cover the possible networking potential with 3D printing, which can be seen as an advanced option, but has lots of learning potential, and will cover the technology sides of STEAM.
The Slicer and Fine-Tuning the Print - Science, Technology, Engineering, Maths
The slicer software has already been mentioned throughout this series of posts, however, this is where a more detailed discussion will take place. Just to recap, the slicer software is what takes the STL file image of the 3D model and turns it into GCode, the instructions used by the printer to construct the model. The settings chosen by the slicer are, in many ways, the most important part of the building process. This can make or break the creation of the model. This is also the part that allows the most experimentation, due to the vast range of settings that can be chosen. As a result, I think the most interesting learning can take place here.
Let's have a look at a slicer. My go-to slicer is Cura, only because it was the first one I was introduced to, it's free and it's actually quite good. I have mentioned some others, like Slic3r, Prusaslicer, and Simplyfy3D. For a good overview and review of other slicers, you can check out the 2019 Best 3D Slicer Software for 3D Printers by Anatol LockerAnatol Locker, which lists a lot of free and paid slicers.
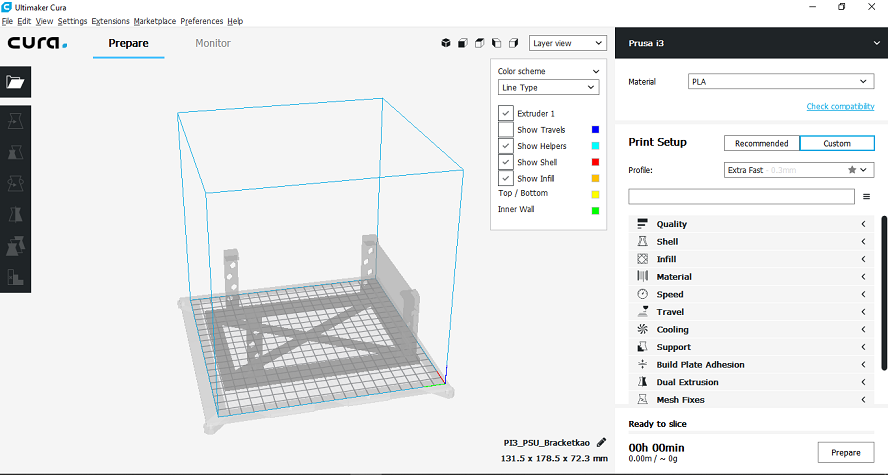
Cura, laid out in the picture above shows you a 3D model of the object you are about to print and has settings you can change. Some of the settings are listed on the right, such as quality, infill, material, speed, and support. Each of these settings are actually headings that expand to allow you to fine-tune aspects of the print. The quality heading, for example, expands like in the image below.
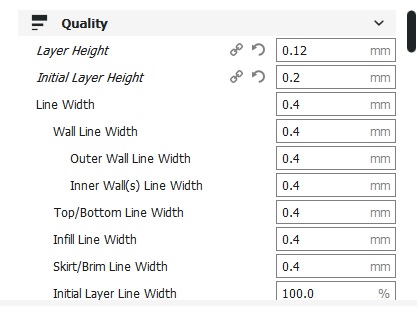
This is a good example of how mathematics factors into this section (pun intended). Let's take the layer height, the very first setting to change in Cura. This is the height of each layer (slice) of the print for the model which will be cut up into thin slices. This is effectively the distance between the print nozzle which extrudes the filament and the build plate. The smaller the number, the thinner it is. So, more layers are needed to complete the print and it will take longer. However, it also means that the model will have higher resolution, and will be of a better quality than if the layers were thicker. If the number is larger, the layers will be thicker, it will print quicker, but the quality will not be as good. A layer height of 0.12 would be classed as quite high quality, whereas a layer height of 0.3 would be low quality. Higher layer heights are used more for practice runs or prototype prints, and low layer height would be used for final products.
Initial layer height is often an important metric for the success of the print. This is the layer height for the very first layer only and is important because a thicker first layer helps your print to stick to the print bed. In 3D printing, the first layer is the most important, and often the most difficult part of the print to get right. Adjusting this setting, along with other first layer options, like the speed and temperature, can go a long way towards getting the perfect first layer.
Although on the surface this seems like simple maths of changing numbers, the layer height setting on 0.12 here has been chosen carefully. The default setting for high-quality prints in Cura is actually 0.1 (0.1 is fine and 0.06 is extra fine). So why did I chose 0.12? This number is a multiple of the smallest height distance that my stepper motor for my Z axis can move, which is 0.04mm. This is known as the magic number. It's advisable to set the layer height to a multiple of this for added quality. So the theory would be that setting my layer height to 0.12 would yield better quality results than setting it to 0.1. Thinking about this adds a more advanced level of mathematics.
The materials section is another area to include mathematics, but also science. This section is where the print head and heating bed temperature can be chosen. This is very dependant on the material used for the filament, and its specific melting point or more specifically, the glass transition point. This is the temperature that the filament turns into a rubbery substance that can be extruded and can stick to itself layer upon layer. The ideal temperature for PLA is between 180 and 230 degrees; for ABS it's 210 to 250 degrees; and for nylon, it's 240 to 260 degrees. Diverging from these temperatures too much results in a failed print due to warping (the filament melting on itself) if the temperature is too higher. If the temperature is too low, the layers may not bond together, or the print will not stick to the bed. This element brings scientific properties of materials, which was touched upon in part 2, which could be investigated a bit further, here. For more on temperatures, you can read Best 3D Printing Temperatures for PLA PETG, Nylon, TPU by Zachary HayZachary Hay.
The engineering aspects of this can come out when picking the type of infill. Infill is the pattern chosen for the inside of hollow models. This helps with structural strength of the model and can be varied greatly using the slicer.
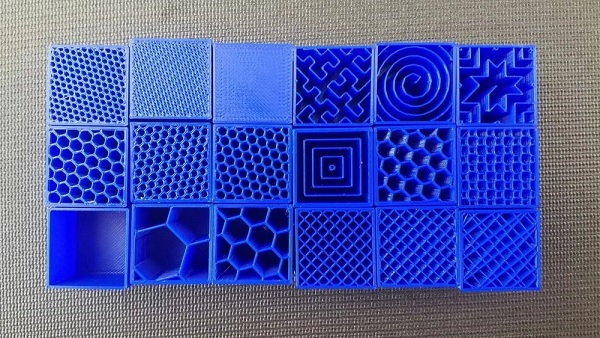
The different patterns above, are all available on Cura, and different slicers have different options. Not only can you choose the pattern, but you can choose the percentage of coverage, with 0 being no infill, and 100 being totally full, to the point where the pattern cannot be seen as there will be no gaps at all. The engineering sides can really be investigated here by students creating models of differing infill patterns and percentages, and testing the strengths of the materials.
The technology side of fine-tuning the slicer is the getting to know the software side of things. There are so many different settings in Cura and other slicer software that can be discussed and introduce different STEAM elements, such as print speed, cooling options, support structures during the printing process and many more. You can check out 2019 Cura Tutorial: Deep Inside the Cura 3D Slicer Software by Dibya ChakravortyDibya Chakravorty for more info on Cura, and you can download it here.
Computing and Networking - Technology
The final section I would like to discuss for this series, is more of an optional extra, not really required for successful printing. However, this can add to the technology aspects of 3D printing, and can stand to be a great learning opportunity for computing subjects. It's always advisable to monitor the print for its duration. However, there are different ways to monitor and control the print other than being in the direct vicinity. I will use my setup as an example. I have 2 cameras viewing my prints from different angles. One is a regular security cam, accessible online, the other is connected to a Raspberry Pi with Octoprint, directly connected to the 3D printer mainboard.
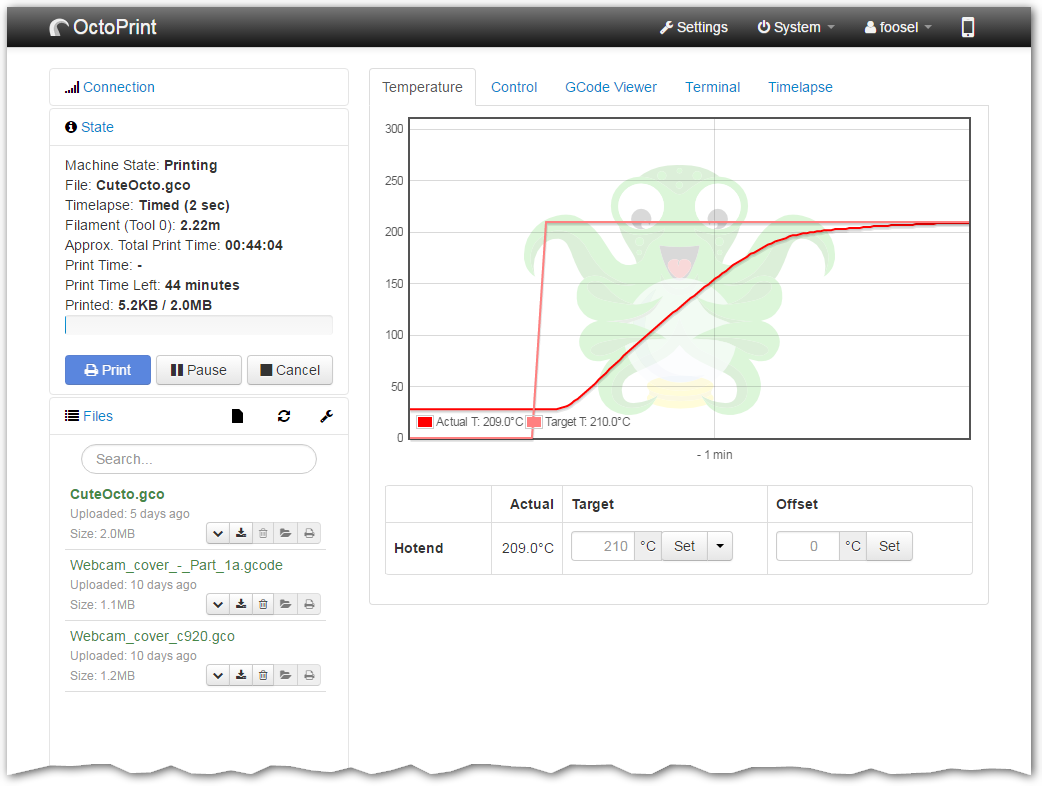
Octoprint is a 3D printing monitoring software that allows you to load prints, monitor and fully control the printer, even when the print is in progress, from moving the axis to changing the temperature of the bed or the hot end. Octoprint also has a camera option, which uses attached cameras to record prints. Even though Octoprint can run on any computer, Raspberry Pis are usually used due to their small size. Pi 3B+ versions are recommended, however, I use a Pi Nano WH (which is not recommended, but I had one lying around, and it seems to work ok).
Other really useful features of Octoprint are viewing GCode via the terminal and seeing virtualisation of the print via the GCode viewer.
Octoprint runs on Octopi, which is a version of the Raspberry Pi OS and is actually a server. This allows you to connect from any device via the Pis IP address. As with any home network IP address, you can connect to it from outside the home network using port forwarding, depending on the router you have. Due to the safety concerns of someone hacking into your home 3D Printer, and potentially burning your house down, it is highly recommended that you connect via a Virtual Private Network, which will encrypt the communication between the server connected to your printer, and the device you are using to connect. This will make it more difficult for someone to hack into it. Setting one up can be really tricky and complicated, but you can use the OpenVPN Road Warrier Installer can cut out a lot of the complicated steps.
Summarizing all these steps into learning opportunities, you have
- Setting up the Raspberry Pi with Octoprint and wifi
- Getting a PiCam and setting it up to record prints
- Setting up an OpenVPN server
This pretty much sums up part 5 and all the STEAM learning opportunities available with 3D printers. There is so much more to learn, and so much fun to be had learning it.